In the digital age, safeguarding your data is paramount. Whether it’s cherished memories, important documents, or critical system files, the loss of data can be devastating. Windows 7 offers a robust built-in solution for data protection and recovery through its Backup and Restore feature. In this comprehensive guide, we’ll delve deep into understanding and utilizing Windows Backup and Restore, empowering users to protect their valuable data and ensure peace of mind.
Understanding Windows Backup and Restore:
Before diving into the intricacies of using the Backup and Restore feature, it’s crucial to grasp its purpose and functionality:
- Data Protection: Windows Backup and Restore is a built-in tool in Windows 7 that allows users to create backup copies of their files, folders, and system images. These backups serve as insurance against data loss due to hardware failure, system crashes, or accidental deletion.
- Backup Types:
- File Backup: This type of backup allows users to selectively back up specific files and folders to an external storage device. File backups are ideal for protecting individual documents, photos, and other user-generated content.
- System Image Backup: System image backups capture an exact copy of the entire system partition, including the operating system, installed programs, and system settings. System image backups provide a comprehensive solution for restoring the entire system to a previous state in the event of a catastrophic failure.
- Backup Schedule: Windows Backup and Restore allows users to schedule automatic backups at regular intervals, ensuring that data is continuously protected without manual intervention.
Using Windows Backup and Restore:
Now, let’s explore the step-by-step process of using Windows Backup and Restore to protect your data in Windows 7:
- Accessing Backup and Restore:
- Click on the Start button in the taskbar.
- Type “Backup and Restore” in the search box and press Enter.
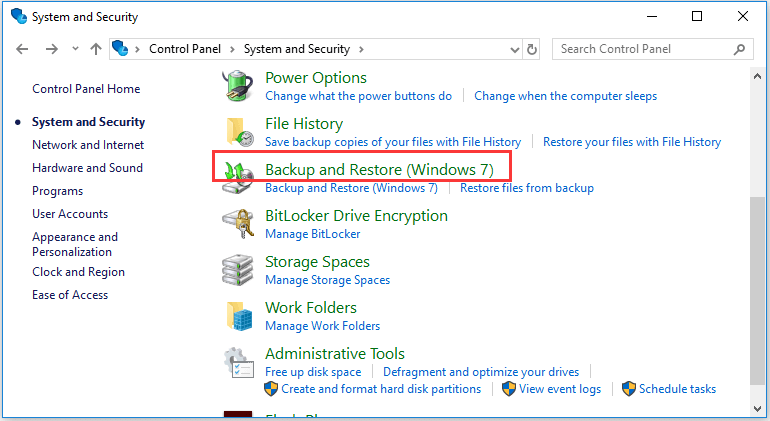
- Alternatively, navigate to “Control Panel” > “System and Security” > “Backup and Restore.”
- Creating a Backup:
- In the Backup and Restore window, click on the “Set up backup” link.
- Select the destination where you want to store the backup, such as an external hard drive or network location.
- Choose whether to let Windows choose what to back up or select specific files and folders to include in the backup.
- Review your backup settings and click “Save settings and run backup” to initiate the backup process.
- Configuring Backup Settings:
- To customize backup settings, click on the “Change settings” link in the Backup and Restore window.
- Here, you can adjust backup schedule, select backup destinations, and manage backup disk space usage.
- Performing a System Image Backup:
- In the Backup and Restore window, click on the “Create a system image” link in the left-hand pane.
- Choose the destination where you want to save the system image, such as an external hard drive.
- Review your settings and click “Start backup” to create the system image.
- Restoring Files and Folders:
- To restore files and folders from a backup, click on the “Restore my files” link in the Backup and Restore window.
- Follow the on-screen instructions to select the backup from which you want to restore files and choose the files and folders to restore.
- Recovering from a System Image Backup:
- If your system encounters a catastrophic failure, you can use a system image backup to restore the entire system to a previous state.
- To perform a system image recovery, boot your computer from a Windows installation disc or recovery drive, and select the “System Image Recovery” option.
Advanced Features and Tips:
Windows Backup and Restore offers several advanced features and tips to enhance data protection and recovery:
- Backup Encryption: To protect sensitive data, you can encrypt your backups using BitLocker encryption. Enable encryption when setting up the backup to ensure that your data remains secure.
- Backup to Network Location: Windows Backup and Restore allows users to back up data to a network location, such as a network-attached storage (NAS) device or a shared folder on another computer.
- Monitoring Backup Status: You can monitor the progress and status of backups by returning to the Backup and Restore window. Here, you can view backup history, check for errors, and ensure that backups are running smoothly.
- Regular Backup Maintenance: It’s essential to periodically review and update your backup settings to ensure that they align with your current data protection needs. Regularly check backup schedules, verify backup integrity, and monitor available backup disk space.
Conclusion:
Windows Backup and Restore in Windows 7 provides a comprehensive and reliable solution for protecting and recovering your valuable data. By following the comprehensive guide outlined above, users can harness the power of Backup and Restore to safeguard their files, folders, and system images against data loss and corruption. Whether it’s creating backups of important documents, preserving cherished memories, or ensuring system resilience against hardware failures, Backup and Restore empowers users to take control of their data and enjoy peace of mind in the face of uncertainty. So take advantage of this powerful tool in Windows 7 and fortify your digital defenses against the ever-present threat of data loss.