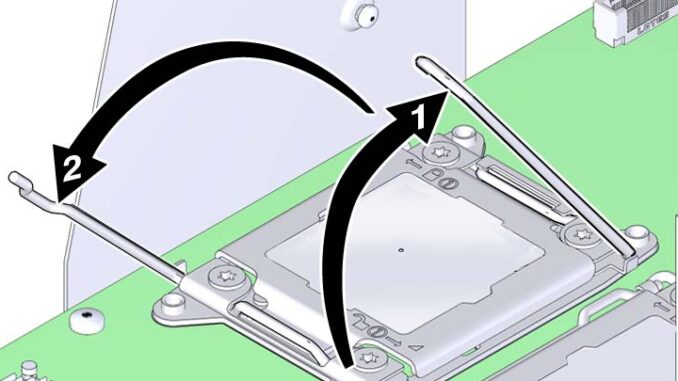
Installing a CPU socket cover is a straightforward yet essential step in preparing your motherboard for storage, shipping, or maintenance. This guide will provide you with a detailed walkthrough on how to install and properly use a CPU socket cover to protect the delicate pins and components of your motherboard.
Table of Contents
- Introduction to CPU Socket Covers
- What is a CPU Socket Cover?
- Importance of Using a CPU Socket Cover
- Pre-Installation Preparation
- Tools and Materials Needed
- Understanding CPU Socket Compatibility
- Installing a CPU Socket Cover
- Step-by-Step Installation Process
- Tips for Secure Installation
- Testing and Verifying Installation
- Ensuring Proper Fit and Protection
- Visual Inspection and Functional Checks
- Removing and Reusing CPU Socket Covers
- Proper Removal Techniques
- Storing and Reusing CPU Socket Covers
- Conclusion
1. Introduction to CPU Socket Covers
What is a CPU Socket Cover?
A CPU socket cover is a protective component designed to shield the delicate pins and contacts of the CPU socket on a motherboard from physical damage, dust, and debris. It typically consists of a plastic or rubberized material that fits securely over the socket, ensuring that the pins remain intact and undamaged during storage, shipping, or when the motherboard is not in use.
Importance of Using a CPU Socket Cover
- Prevention of Damage: Protects the sensitive pins and contacts of the CPU socket from bending, breaking, or being contaminated by dust or debris.
- Maintains Electrical Integrity: Ensures that the socket remains clean and free from foreign objects that could potentially short-circuit components.
- Facilitates Safe Handling: Provides a safe method for handling and storing motherboards, especially during transportation or when not in active use.
2. Pre-Installation Preparation
Tools and Materials Needed
- CPU Socket Cover: Typically provided with the motherboard or available as a separate accessory.
- Anti-static Wrist Strap: Prevents static discharge that could damage sensitive components.
- Clean Workspace: A clean, well-lit area free from dust and clutter.
Understanding CPU Socket Compatibility
- Motherboard Compatibility: Ensure the CPU socket cover is designed specifically for your motherboard’s socket type (e.g., LGA 1151, AM4).
- Check Manufacturer Specifications: Refer to the motherboard manual or manufacturer’s website for details on compatible CPU socket covers.
3. Installing a CPU Socket Cover
Step-by-Step Installation Process
- Prepare Motherboard:
- Place the motherboard on a flat, stable surface with the CPU socket facing upward.
- Ensure the motherboard is securely positioned to prevent accidental movement.
- Inspect the CPU Socket Cover:
- Check the CPU socket cover for any visible damage or defects before installation.
- Ensure that the cover is clean and free from dust or foreign particles.
- Align and Position the CPU Socket Cover:
- Align the CPU socket cover with the corresponding socket on the motherboard.
- Gently lower the cover onto the socket, ensuring it fits snugly and evenly over the socket pins.
- Secure the CPU Socket Cover:
- Press down firmly on the center of the cover to ensure all pins are properly protected.
- Verify that the cover is securely seated and does not easily shift or come loose.
Tips for Secure Installation
- Even Pressure: Apply even pressure when seating the CPU socket cover to prevent uneven contact with the socket pins.
- Visual Inspection: After installation, visually inspect the cover to ensure that all socket pins are fully covered and protected.
- Avoid Force: Do not force the CPU socket cover into place, as this could potentially damage the socket or pins.
4. Testing and Verifying Installation
Ensuring Proper Fit and Protection
- Visual Inspection: Carefully examine the CPU socket cover to ensure that all socket pins are fully enclosed and protected.
- Functionality Check: While the cover is installed, verify that the motherboard is not powered on and no components are inserted into the socket.
Visual Inspection and Functional Checks
- Check for Damage: Inspect the CPU socket cover for any signs of damage or wear after installation.
- Verify Accessibility: Ensure that the cover does not obstruct access to other motherboard components or connectors.
5. Removing and Reusing CPU Socket Covers
Proper Removal Techniques
- Power Off and Unplug:
- Before removing the CPU socket cover, power off the motherboard and disconnect all power sources.
- Use an anti-static wrist strap to discharge any static electricity before handling the motherboard.
- Gently Lift and Remove:
- Carefully lift the CPU socket cover straight up from the socket, applying gentle pressure to avoid bending or damaging the socket pins.
- Avoid twisting or tilting the cover during removal to prevent accidental damage.
Storing and Reusing CPU Socket Covers
- Clean and Store Properly: Clean the CPU socket cover with a soft, lint-free cloth if necessary before storing.
- Keep in Original Packaging: Store the CPU socket cover in its original packaging or a protective case to prevent dust or physical damage.
- Reuse with Caution: Reuse the CPU socket cover when reinstalling or storing the motherboard for future use, ensuring it remains intact and functional.
6. Conclusion
Installing a CPU socket cover is a simple yet crucial step in protecting the delicate pins and components of your motherboard. By following this comprehensive guide, you can safely and effectively install a CPU socket cover to safeguard your motherboard during storage, shipping, or maintenance. Remember to handle the motherboard with care, use proper installation techniques, and verify the cover’s fit and functionality before proceeding. With proper installation and maintenance, a CPU socket cover ensures the longevity and reliability of your motherboard’s CPU socket, protecting it from potential damage and ensuring optimal performance when the cover is not in use.