Introduction to Installing Windows 7
Windows 7, released by Microsoft in 2009, remains a popular operating system known for its stability, user-friendly interface, and compatibility with a wide range of software and hardware. Whether you are upgrading from an older version of Windows or performing a fresh installation on a new computer, the process involves a series of steps to ensure a successful installation.
Preparation
Before you begin installing Windows 7, make sure you have the following:
- Windows 7 Installation Media:
- Obtain a Windows 7 installation DVD or create a bootable USB drive with the Windows 7 ISO file. You can download the ISO file from the Microsoft website if you have a valid product key.
- Product Key:
- Ensure you have a valid Windows 7 product key. This is usually found on a sticker on your computer or included with your Windows 7 purchase.
- Backup Important Data:
- If you are performing a clean installation, back up your important files and documents to an external storage device or cloud service. Installing Windows 7 will erase all data on the drive.
- Hardware Compatibility Check:
- Verify that your computer meets the minimum hardware requirements for Windows 7. This includes processor speed, RAM, and available disk space.
- Internet Connection (Optional):
- While not required during installation, having an internet connection allows you to download updates and drivers during or after the installation process.
Step-by-Step Guide to Install Windows 7
Step 1: Insert Installation Media
- Insert DVD or USB Drive:
- Insert the Windows 7 installation DVD into your computer’s optical drive. If you are using a USB drive, insert it into a USB port.
Step 2: Boot from Installation Media
- Access BIOS/UEFI Settings:
- Restart your computer and access the BIOS/UEFI settings by pressing the appropriate key (often Del, F2, Esc, F10, or F12) during startup. Consult your motherboard manual for the correct key.
- Set Boot Device Priority:
- In the BIOS/UEFI settings, navigate to the Boot or Boot Priority section.
- Set the DVD drive or USB drive (depending on your installation media) as the first boot device. Save changes and exit BIOS/UEFI.
Step 3: Start Windows 7 Installation
- Boot from Installation Media:
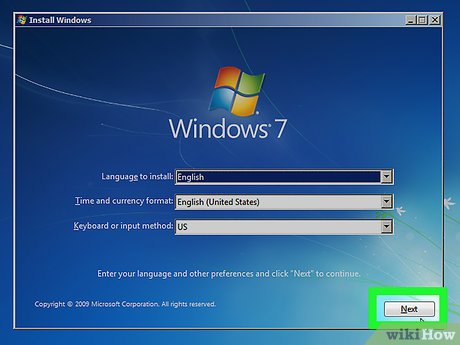
- Your computer will now boot from the Windows 7 installation media. You will see the Windows Setup screen.
- Select Language and Keyboard Settings:
- Choose your language, time, and currency format, and keyboard or input method, then click “Next.”
- Click Install Now:
- On the next screen, click “Install Now” to begin the installation process.
Step 4: Enter Product Key
- Enter Product Key:
- Enter your 25-character product key for Windows 7. Click “Next” to continue.
Step 5: Accept License Terms
- Accept License Terms:
- Read the Microsoft Software License Terms and check the box next to “I accept the license terms.” Click “Next.”
Step 6: Choose Installation Type
- Select Installation Type:
- Choose between “Upgrade” (if you are upgrading from a previous version of Windows) or “Custom (advanced)” for a clean installation.
Step 7: Select Disk Partition
- Select Disk Partition:
- If performing a clean installation, select the drive or partition where you want to install Windows 7. Click “Next” to continue.
Step 8: Install Windows 7
- Begin Installation:
- Windows 7 will now begin installing. This process may take some time, depending on your computer’s speed and hardware configuration.
Step 9: Complete Installation
- Set Up Windows:
- Follow the on-screen prompts to personalize your Windows settings, such as creating a user account, choosing a computer name, and setting up network preferences.
- Install Drivers and Updates (Optional):
- After Windows 7 is installed, you may need to install drivers for your hardware components, such as graphics cards, network adapters, and printers. Windows Update can help you download the latest updates and drivers automatically.
- Activate Windows:
- Once installation is complete and you are connected to the internet, activate Windows 7 using your product key. Follow the prompts to complete activation.
Step 10: Enjoy Windows 7
- Explore Windows 7:
- Once activated, you can start using Windows 7 and exploring its features, such as the Start Menu, Taskbar, Windows Explorer, and built-in applications.
Conclusion
Installing Windows 7 is a manageable process that involves preparing your computer, booting from installation media, and following prompts to set up the operating system. By following this step-by-step guide and ensuring you have the necessary tools and components, you can successfully install Windows 7 on your PC.
Always refer to specific instructions provided by Microsoft or your computer manufacturer for detailed guidance and troubleshooting tips tailored to your hardware and installation scenario.