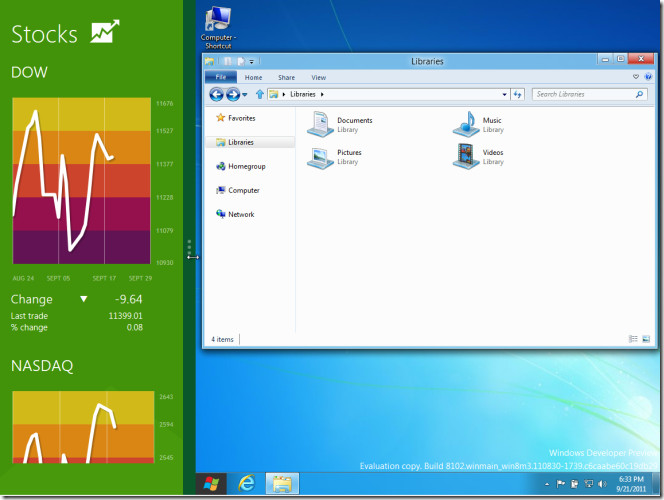
The Snap feature in Windows 8 is a convenient and powerful tool that allows users to multitask more effectively by snapping apps side by side on the screen. With Snap, you can easily work with multiple apps simultaneously, comparing information, and boosting productivity. In this comprehensive guide, we’ll explore everything you need to know about using the Snap feature in Windows 8, from understanding how it works to mastering its various functionalities and keyboard shortcuts.
Understanding Snap:
Snap is a built-in feature of Windows 8 that allows users to “snap” or dock apps to the sides of the screen, making it easy to view and work with multiple apps simultaneously. Snap enhances multitasking capabilities by providing a simple and intuitive way to organize and arrange app windows on the desktop. Here are some key features of Snap:
- Side-by-Side Viewing: Snap allows you to dock two apps side by side on the screen, making it easy to compare information, copy and paste content, or work on two tasks simultaneously.
- Resizable Panes: You can resize the snapped app panes by dragging the dividing line between them, allowing you to adjust the size of each app window according to your preferences.
- Automatic Snapping: Windows 8 automatically snaps apps to the sides of the screen when you drag them to the edge, making it easy to snap apps quickly and efficiently.
Using Snap:
Using Snap in Windows 8 is straightforward and easy. Here’s how to snap apps side by side on the screen:
- Snap with Mouse:
- Click and hold the title bar of an app window.
- Drag the app window to the left or right edge of the screen until the cursor touches the edge.
- Release the mouse button, and the app window will snap to the edge of the screen.
- Snap with Touch:
- Swipe from the left edge of the screen to switch between open apps.
- Drag an app window from the top edge and move it to the left or right side of the screen until it snaps into place.
- Snap with Keyboard Shortcut:
- Press the Windows key + Left Arrow to snap the current app window to the left side of the screen.
- Press the Windows key + Right Arrow to snap the current app window to the right side of the screen.
- Resize Panes:
- To resize the snapped app panes, drag the dividing line between them left or right to adjust the size of each app window.
Maximizing Snap Efficiency:
To make the most of the Snap feature in Windows 8 and boost productivity, consider the following tips and tricks:
- Use Multiple Monitors: If you have multiple monitors, you can snap apps across different screens, maximizing workspace and productivity.
- Keyboard Shortcuts: Memorize keyboard shortcuts for snapping apps quickly and efficiently, saving time and effort.
- Experiment with Layouts: Try different combinations of snapped apps to find the layout that works best for your workflow and tasks.
- Snap Assist: Take advantage of Snap Assist, which automatically suggests other apps to snap when you snap an app to the side of the screen, making it easy to multitask efficiently.
Conclusion:
The Snap feature in Windows 8 is a powerful tool that enhances multitasking capabilities and boosts productivity by allowing users to easily organize and arrange app windows side by side on the screen. Whether you’re comparing information, copying and pasting content, or working on multiple tasks simultaneously, Snap provides a simple and intuitive way to manage app windows and maximize workspace efficiency. By mastering the various methods of snapping apps and experimenting with different layouts, you can make the most of the Snap feature in Windows 8 and take your multitasking to the next level.