Introduction
In the intricate dance of digital systems, the Boot Configuration File (BCD) serves as a critical choreographer, orchestrating the startup process for Windows 10. However, when errors disrupt this performance, users are thrust into a realm of frustration and uncertainty. This comprehensive guide aims to demystify the complexities surrounding Boot Configuration File errors in Windows 10, providing users with a detailed roadmap to diagnose, troubleshoot, and resolve these issues. Whether you’re a seasoned IT professional or a casual user encountering boot problems, this guide equips you with the knowledge and tools needed to bring your system back to life.
Understanding the Boot Configuration File (BCD)
1. Role of BCD in Windows 10:
- The BCD is a crucial component that contains information about the installed operating systems, their boot parameters, and the location of the Windows Boot Manager. It plays a pivotal role in initiating the startup process.
2. Common BCD Errors:
- BCD errors can manifest in various forms, including “BOOTMGR is missing,” “Windows failed to start,” or specific error codes like 0xc000000f. These errors often indicate issues with the BCD that require attention.
3. Causes of BCD Errors:
- BCD errors can stem from a range of issues, including corrupt system files, incorrect boot configurations, hardware failures, or disruptions during system updates.
Diagnosing BCD Errors
1. Error Messages and Codes:
- Pay close attention to error messages and codes displayed during the boot process. These can provide valuable insights into the nature of the BCD error.
2. Accessing Advanced Startup Options:
- Windows 10 offers Advanced Startup Options that facilitate diagnostic and repair procedures. Access these options by restarting your computer and holding down the Shift key while clicking “Restart” from the Start menu.
3. Using Windows Recovery Environment (WinRE):
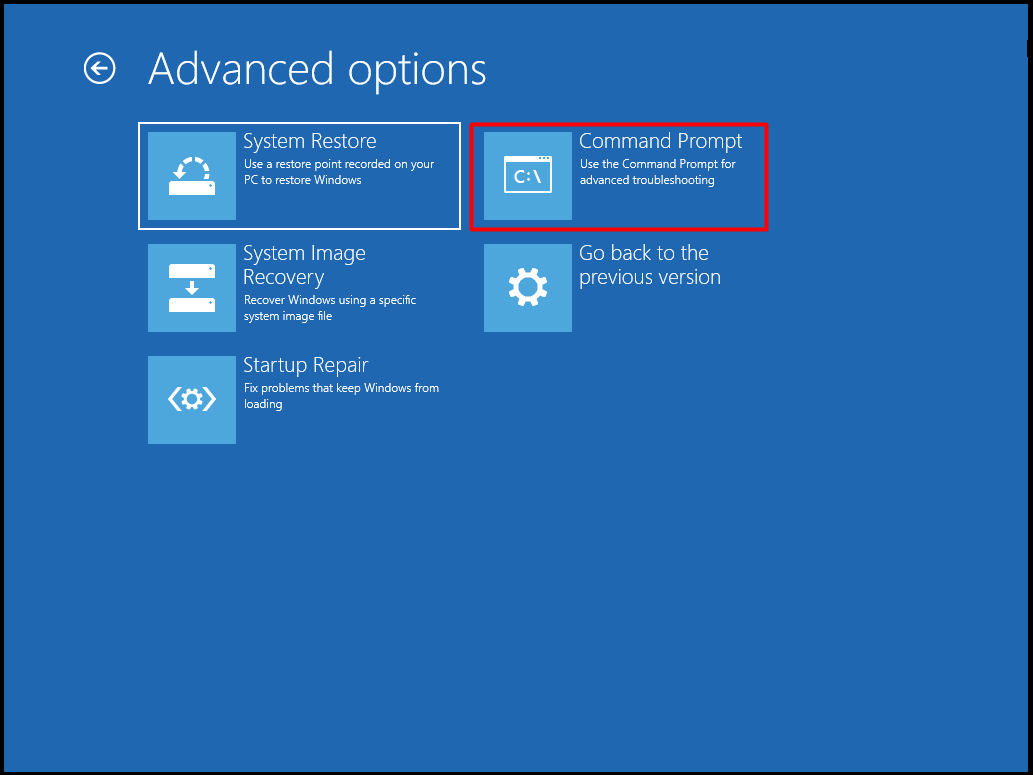
- WinRE is a built-in recovery environment that provides tools for troubleshooting and repairing system issues. Access WinRE from Advanced Startup Options and explore options like System Restore, Startup Repair, and Command Prompt.
Step-by-Step Solutions for BCD Errors
1. Performing a Startup Repair:
- The Startup Repair tool can automatically detect and fix issues with the BCD.
- Access Advanced Startup Options or WinRE.
- Choose “Troubleshoot” > “Advanced options” > “Startup Repair.”
- Follow the on-screen instructions for automatic repair.
2. Rebuilding BCD Using Command Prompt:
- The Command Prompt offers manual solutions for rebuilding the BCD.
- Access Command Prompt from Advanced Startup Options or WinRE.
- Use the following commands:
bash
bootrec /scanos

bootrec /rebuildbcd
3. Fixing BCD with Bootrec Commands:
- The Bootrec tool provides additional commands for fixing BCD errors.
- Access Command Prompt from Advanced Startup Options or WinRE.
- Use the following commands:
bash
bootrec /scanos

bootrec /rebuildbcd

bootrec /fixmbr

bootrec /fixboot
4. Manually Editing BCD:
- Advanced users can manually edit the BCD using the bcdedit command.
- Access Command Prompt from Advanced Startup Options or WinRE.
- Use the bcdedit command to view and edit boot configuration entries.
5. Checking Disk for Errors:
- Disk errors can contribute to BCD problems. Use the chkdsk command to check and repair disk errors.
- Access Command Prompt from Advanced Startup Options or WinRE.
- Use the following command:
bash
chkdsk /f /r C:
Creating a System Image Backup
1. Creating a System Image:
- Before attempting any BCD repairs, create a system image backup to safeguard your data and system state.
- Open Control Panel and go to “Backup and Restore.”
- Select “Create a system image” and follow the wizard to create a backup.
2. Restoring from a System Image:
- In case BCD repairs lead to unforeseen issues, you can restore your system from the created system image.
- Access Advanced Startup Options or WinRE.
- Choose “Troubleshoot” > “Advanced options” > “System Image Recovery” and follow the prompts.
Best Practices for BCD Maintenance
1. Regularly Update Windows:
- Keep your operating system up to date by installing the latest Windows updates. Updates often include bug fixes and improvements that enhance system stability.
2. Use Reliable Antivirus Software:
- Employ reputable antivirus software to protect your system from malware and other threats. Regularly update the antivirus definitions and perform full system scans.
3. Exercise Caution with Third-Party Software:
- Be selective when installing third-party software. Some optimization tools or system utilities may interfere with system files, leading to BCD errors.
4. Keep Drivers Updated:
- Ensure that device drivers are up to date, especially those related to critical system components like graphics and storage controllers.
5. Regularly Check Disk Health:
- Periodically check the health of your storage device using tools like CrystalDiskInfo or manufacturer-specific utilities. Address any issues promptly to prevent disk-related BCD errors.
6. Monitor System Events:
- Use tools like Event Viewer to monitor system events and identify potential issues. Investigate and address critical events that may contribute to BCD errors.
Conclusion
The Boot Configuration File (BCD) serves as the architectural blueprint for Windows 10’s startup process, and when errors arise, they can disrupt the entire system performance. This comprehensive guide, enriched with insights into diagnosing, troubleshooting, and resolving BCD errors, empowers users to navigate the complexities of boot-related issues. Whether you’re a tech enthusiast diving into the intricacies of system repair or a casual user seeking a reliable solution, the step-by-step solutions and best practices outlined here provide a roadmap to restore your system’s vitality. As you embark on the journey to fix BCD errors in Windows 10, let this guide be your compass, guiding you through the intricacies of the startup process and ensuring a seamless and reliable computing experience.