Introduction:
In the world of music, album covers serve as powerful visual representations of an artist’s identity and the essence of their music. From iconic designs of the past to contemporary artworks, album covers play a significant role in captivating audiences and conveying the mood and style of the music within. Retro album covers, in particular, evoke nostalgia and charm, drawing inspiration from vintage aesthetics and graphic design trends of bygone eras. In this extensive guide, we embark on a creative journey to design a funky retro album cover using Adobe Photoshop, exploring techniques, tips, and design elements to achieve a captivating and visually striking result.
Step 1: Conceptualizing the Design:
Before diving into Photoshop, it’s essential to have a clear concept and vision for the retro album cover. Consider the genre, style, and mood of the music, as well as any specific themes or motifs you wish to incorporate. Drawing inspiration from retro design trends, such as psychedelic graphics, bold typography, and vibrant colors, can help guide the creative process and inspire unique ideas for the album cover design.
Step 2: Setting Up the Canvas:
Open Adobe Photoshop and create a new document with dimensions suitable for an album cover, typically around 12 inches by 12 inches at 300 DPI for high-quality printing. Ensure that the color mode is set to CMYK for accurate color representation in print.
Step 3: Choosing Retro Graphics and Textures:
To achieve a funky retro vibe, source vintage-inspired graphics, patterns, and textures to use in the album cover design. Look for retro patterns such as geometric shapes, paisley prints, or psychedelic swirls, as well as vintage textures like aged paper or distressed effects. Websites offering free or royalty-free retro graphics and textures are excellent resources for finding inspiration and design elements.
Step 4: Creating the Background:
Start by creating a vibrant and eye-catching background for the album cover. Use the Paint Bucket tool to fill the canvas with a retro-inspired pattern or texture, adjusting the scale and opacity as needed to achieve the desired effect. Experiment with blending modes such as Multiply or Overlay to enhance the texture and depth of the background.
Step 5: Adding Retro Typography:
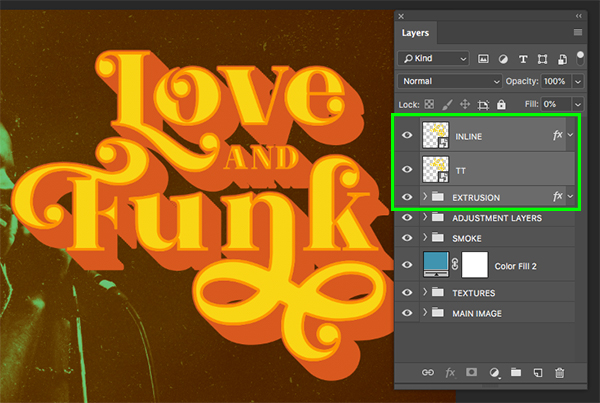
Typography plays a crucial role in retro album covers, often featuring bold, geometric fonts or quirky hand-lettered styles. Choose a font that complements the retro aesthetic and reflects the mood of the music. Experiment with different font sizes, weights, and colors to create dynamic typography that commands attention. Consider adding effects such as drop shadows, outlines, or texture overlays to enhance the retro vibe of the text.
Step 6: Incorporating Vintage Imagery:
To further enhance the retro feel of the album cover, incorporate vintage imagery or illustrations that resonate with the music’s theme or mood. This could include retro-inspired illustrations, vintage photographs, or stylized graphics reminiscent of old-school album covers. Blend these elements seamlessly into the design, adjusting their size, position, and opacity to create visual interest and balance.
Step 7: Adding Visual Effects:
To add depth and dimension to the album cover, experiment with visual effects such as lighting effects, gradients, or filters. Apply subtle textures or color overlays to unify the design and create a cohesive retro aesthetic. Consider using Photoshop’s layer styles and adjustment layers to fine-tune the overall look and feel of the design, adding highlights, shadows, or color toning effects as desired.
Step 8: Fine-Tuning and Refining:
Once the basic elements of the retro album cover are in place, take the time to fine-tune and refine the design. Pay attention to details such as alignment, spacing, and composition, ensuring that the layout is visually balanced and harmonious. Make adjustments to colors, typography, and graphic elements as needed to achieve the desired look and feel. Don’t be afraid to experiment and iterate on the design until it feels just right.
Step 9: Saving and Exporting:
When you’re satisfied with the final design, save your work in a high-quality format suitable for printing, such as PSD or TIFF. Consider creating multiple versions of the album cover for different purposes, such as digital distribution or vinyl pressing. Export the final design as a JPEG or PDF file with the appropriate resolution and color settings for printing or online distribution.
Step 10: Sharing and Promoting:
Once the retro album cover is complete, share it with the world and promote it alongside the music it represents. Consider creating promotional materials such as posters, social media graphics, or merchandise featuring elements from the album cover to build excitement and engage with fans. With a captivating retro album cover and compelling visuals, you’ll set the stage for a memorable music listening experience.
Conclusion:
In conclusion, designing a funky retro album cover in Photoshop offers a creative opportunity to channel the nostalgia and charm of vintage aesthetics while showcasing the essence of the music within. By following these steps and experimenting with retro-inspired graphics, typography, and visual effects, you can craft a captivating and visually striking album cover that resonates with audiences and leaves a lasting impression. Whether you’re a musician, designer, or music enthusiast, embrace the retro vibe and let your creativity shine in designing the perfect album cover for your next musical masterpiece.