Using File History in Windows 8 is a valuable feature that allows you to automatically back up and restore your files, ensuring that your data is protected against accidental deletion, file corruption, or hardware failure. File History provides a seamless and reliable way to safeguard your important documents, photos, music, and other files by continuously backing them up to an external drive or network location. In this comprehensive guide, we’ll explore everything you need to know about using File History in Windows 8, from setting it up to recovering files and managing backups effectively.
Understanding File History:
File History is a built-in backup feature introduced in Windows 8 that automatically backs up your files to an external drive or network location. Here are some key features of File History:
- Continuous Backup: File History continuously monitors your selected folders for changes and automatically backs up new and modified files at regular intervals.
- Versioning: File History maintains multiple versions of your files, allowing you to restore previous versions if needed. This can be helpful in recovering from accidental changes or file corruption.
- Easy Recovery: With File History, recovering files is a straightforward process, as you can browse through a timeline of backups and select the version of the file you want to restore.
- Customizable Settings: File History allows you to customize various settings, such as the frequency of backups, the duration of file retention, and the folders to include or exclude from backups.
Now, let’s explore how to use File History in Windows 8 effectively:
Setting Up File History:
- Connect an External Drive:
- Begin by connecting an external hard drive to your Windows 8 device. This will serve as the backup destination for File History.
- Access File History Settings:
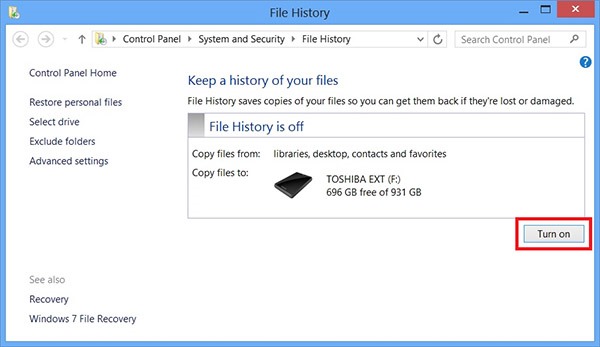
- Open the Control Panel and navigate to “System and Security” > “File History.”
- Click or tap on “Turn on” to enable File History and select the external drive you want to use for backups.
- Customize Settings:
- Click or tap on “Advanced settings” to customize File History settings, such as backup frequency, file retention period, and folders to include or exclude from backups.
Performing Backups:
- Automatic Backups:
- Once File History is set up, it will automatically start backing up your files according to the configured schedule.
- File History will monitor the selected folders for changes and back up new and modified files accordingly.
- Manual Backup:
- You can initiate a manual backup at any time by clicking or tapping on “Run now” in the File History settings.
Recovering Files:
- Accessing File History:
- To restore files from File History, open the Control Panel and navigate to “System and Security” > “File History.”
- Click or tap on “Restore personal files” to access File History.
- Browsing Versions:
- Use the timeline on the left side of the File History window to browse through previous versions of your files.
- Select the version of the file you want to restore and click or tap on the “Restore” button to recover it.
Managing Backups:
- Manage File History Settings:
- Periodically review and adjust File History settings as needed, such as backup frequency, file retention period, and included/excluded folders.
- Monitor Backup Drive:
- Ensure that the external drive used for File History backups is connected and functioning properly.
- Replace or upgrade the backup drive as needed to accommodate growing storage requirements.
Tips for Effective Use:
- Regularly Review Backups: Periodically review your File History backups to ensure that all important files are being backed up and that backups are occurring as expected.
- Include Important Folders: Make sure to include all important folders in your File History backups to ensure comprehensive coverage of your data.
- Educate Users: If using File History in a shared or family environment, educate users about the importance of backups and how to access and restore files from File History.
Conclusion:
Using File History in Windows 8 is an essential step for protecting your important files and data against loss or corruption. By following the steps outlined in this guide and regularly monitoring and managing your File History backups, you can ensure that your files are securely backed up and easily recoverable in the event of a data loss incident. So, whether you’re working on important documents, editing photos, or creating music, File History provides peace of mind and confidence that your files are safe and secure.