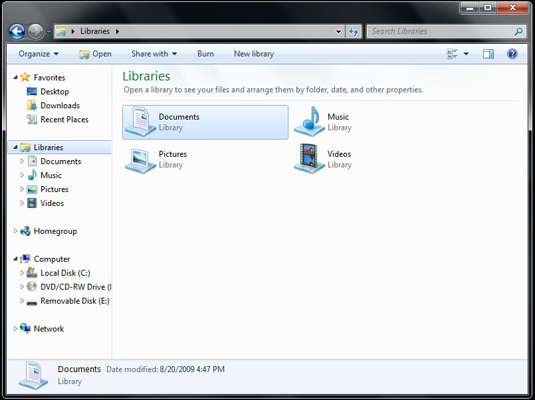
In the dynamic digital landscape of Windows 7, organizing and managing files efficiently is paramount for productivity and accessibility. Libraries, a powerful feature introduced in Windows 7, serve as virtual collections of folders from various locations, allowing users to aggregate related files and access them seamlessly. In this extensive guide, we will embark on a journey to demystify library management, focusing specifically on creating new libraries in Windows 7. By mastering this fundamental skill, users can enhance their file organization capabilities and streamline their computing experience.
Understanding Libraries in Windows 7:
Before delving into the creation process, it’s essential to grasp the concept and significance of libraries in Windows 7:
- Definition: Libraries are virtual folders that aggregate content from multiple locations on your computer or network into a single view. They provide a unified interface for accessing and managing files, regardless of their physical location.
- Organizational Tool: Libraries serve as powerful organizational tools, allowing users to categorize and group related files, such as documents, photos, music, and videos, without moving them from their original locations.
- Customization: Windows 7 includes default libraries for common file types, such as Documents, Music, Pictures, and Videos. However, users can create custom libraries tailored to their specific needs, enabling them to organize files according to their workflow or preferences.
Creating a New Library:
Now, let’s explore the step-by-step process of creating a new library in Windows 7:
- Accessing Libraries:
- Click on the Start button in the taskbar.
- Navigate to the desired folder where you want to create the new library.
- Alternatively, open Windows Explorer (Windows key + E) and navigate to a folder of your choice.
- Creating a New Library:
- In the navigation pane of Windows Explorer, right-click on the “Libraries” folder.
- Select “New” from the context menu, and then choose “Library.”
- A new library icon will appear in the Libraries section, with the default name “New Library.” You can rename the library by right-clicking on it and selecting “Rename.”
- Adding Folders to the Library:
- To populate the newly created library with folders, right-click on the library icon and select “Properties.”
- In the Library Properties window, click on the “Include a folder” button.
- Browse to the folder you want to include in the library, select it, and click “Include folder.”
- Repeat this process to add additional folders to the library.
- Customizing Library Properties:
- In the Library Properties window, you can customize various aspects of the library, such as its name and default save location.
- Click on the “Set save location” button to specify where files saved to the library will be stored by default.
- You can also arrange folders within the library by clicking on the “Arrange by” dropdown menu and selecting your preferred sorting criteria.
- Managing Library Content:
- Once the library is created and configured, you can start managing its content. Simply drag and drop files into the library from their original locations, or use the “Include a folder” button in the Library Properties window to add additional folders.
Advanced Features and Tips:
To make the most of libraries in Windows 7, consider the following advanced features and tips:
- Custom Icons: Customize library icons to distinguish them visually from default libraries. Right-click on the library icon, select “Properties,” and then click on the “Change icon” button to choose a new icon from the available options.
- Search Folders: Use search folders to create dynamic libraries that automatically include files matching specific criteria, such as file type, date modified, or keyword. Right-click on the library icon, select “New,” and then choose “Search folder” to create a search-based library.
- Backup and Restore Libraries: To back up your libraries or transfer them to another computer, navigate to the following location: “C:\Users<username>\AppData\Roaming\Microsoft\Windows\Libraries.” Copy the library files (.library-ms) to a backup location or transfer them to the desired computer.
Conclusion:
Creating new libraries in Windows 7 is a fundamental skill that empowers users to organize and manage their files efficiently. By following the comprehensive guide outlined above, users can harness the power of libraries to aggregate related files, streamline their workflow, and enhance productivity. Whether it’s grouping documents for a project, organizing photos by event, or categorizing music by genre, libraries provide a flexible and intuitive solution for file organization. So take control of your digital environment today, create custom libraries tailored to your needs, and unlock new levels of efficiency and organization in your Windows 7 experience.