In the realm of Windows 7, User Account Control (UAC) stands as a crucial line of defense against unauthorized system changes and malicious activities. This security feature prompts users for confirmation when attempting to perform tasks that require elevated privileges, ensuring that only trusted actions are executed. However, UAC is not a one-size-fits-all solution, and users may wish to customize its settings to strike the right balance between security and convenience. In this exhaustive guide, we will delve deep into the intricacies of configuring UAC settings in Windows 7, empowering users to tailor UAC to their specific needs while maintaining robust system security.
Understanding User Account Control (UAC):
Before delving into the configuration process, let’s first grasp the fundamental concepts of User Account Control (UAC) in Windows 7:
- Purpose: User Account Control (UAC) is a security feature introduced in Windows Vista and continued in Windows 7. Its primary purpose is to mitigate the risks associated with malicious software and unauthorized system changes by prompting users for consent or credentials before allowing certain actions to be performed.
- Elevation Mechanism: When a user attempts to perform a task that requires administrative privileges, such as installing software or modifying system settings, UAC prompts the user for consent or credentials. This elevation mechanism helps prevent unauthorized actions from being executed without the user’s explicit approval.
- Levels of Consent: UAC offers different levels of consent, ranging from simply notifying the user of elevation requests to requiring explicit confirmation or entering administrator credentials. Users can customize these settings to balance security with convenience.
Configuring UAC Settings:
Now, let’s explore the step-by-step process of configuring User Account Control (UAC) settings in Windows 7:
- Accessing UAC Settings:
- Click on the Start button in the taskbar.
- Type “UAC” in the search box and press Enter.
- Alternatively, navigate to “Control Panel” > “User Accounts” > “Change User Account Control settings.”
- Adjusting UAC Level:
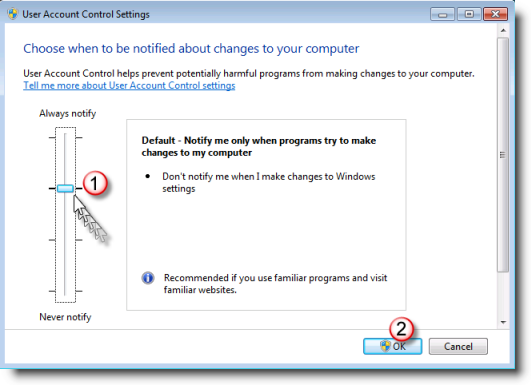
- In the UAC settings window, you’ll see a slider with four levels of notification:
- Always notify: Prompt for consent or credentials for all elevation requests.
- Notify me only when programs try to make changes to my computer (default): Notify the user only when a program attempts to make changes to the computer’s settings.
- Notify me only when programs try to make changes to my computer (do not dim my desktop): Similar to the default level but without dimming the desktop when prompting for consent.
- Never notify: Disable UAC, allowing programs to make changes to the computer without prompting the user for consent or credentials.
- In the UAC settings window, you’ll see a slider with four levels of notification:
- Customizing UAC Settings:
- To customize UAC settings further, click on the “Change settings” button.
- Here, you can choose whether to use the Secure Desktop for elevation prompts, which enhances security by isolating elevation prompts from other processes.
- You can also specify whether to automatically elevate privileges for administrators without prompting for consent.
- Testing UAC Settings:
- After configuring UAC settings, it’s essential to test them to ensure they meet your requirements while maintaining system security.
- Try performing tasks that require administrative privileges, such as installing software or modifying system settings, to verify that UAC prompts are displayed according to your configured settings.
Best Practices and Tips:
To make the most of UAC and ensure optimal security and usability, consider the following best practices and tips:
- Keep UAC Enabled: While it may be tempting to disable UAC to avoid frequent prompts, doing so significantly reduces the security of your system. It’s recommended to keep UAC enabled at all times to protect against unauthorized actions and malware.
- Use the Default UAC Level: For most users, the default UAC level (notify me only when programs try to make changes to my computer) strikes a good balance between security and convenience. Only adjust UAC settings if you have specific requirements or preferences.
- Be Cautious with Administrative Privileges: Avoid using an account with administrative privileges for everyday tasks. Instead, use a standard user account for routine activities and only switch to an administrator account when necessary. This practice helps minimize the impact of potential security threats.
- Stay Informed: Keep yourself informed about the latest security threats and best practices for securing your Windows 7 system. Regularly update your system and security software to protect against emerging threats and vulnerabilities.
Conclusion:
Configuring User Account Control (UAC) settings in Windows 7 is a critical aspect of maintaining system security and usability. By following the comprehensive guide outlined above, users can tailor UAC settings to strike the right balance between security and convenience, ensuring robust protection against unauthorized actions and malicious software while minimizing user interruptions. Whether it’s adjusting UAC notification levels, customizing elevation settings, or testing UAC behavior, users can leverage UAC’s flexibility to enhance their Windows 7 experience. So take control of your system’s security today by configuring UAC settings according to your needs and preferences, and enjoy peace of mind knowing that your system is safeguarded against potential threats.