Introduction:
In the ever-evolving world of digital photography and design, the quest for precision and efficiency is paramount. Adobe Photoshop, a powerhouse in creative software, continuously introduces features to enhance the editing experience. Dual View Photo Editing stands out as a versatile and powerful tool, providing photographers and designers with the ability to simultaneously view and edit different parts of an image. This comprehensive guide explores the intricacies of Dual View in Photoshop, delving into its features, applications, and providing step-by-step tutorials to empower users in their pursuit of flawless and efficient photo editing.
Section 1: Unveiling the Power of Dual View
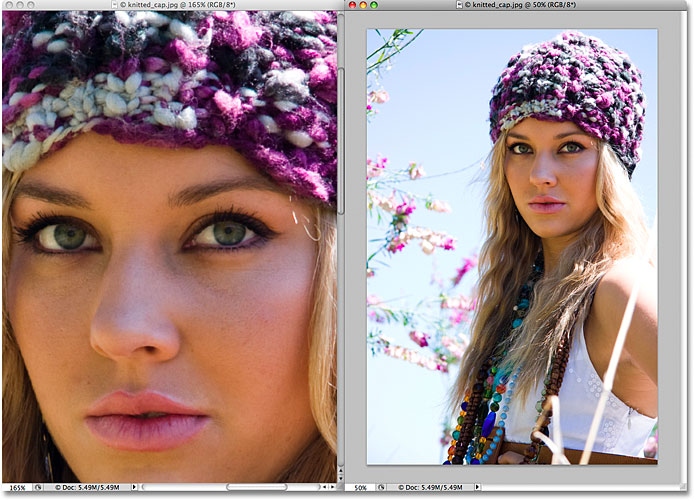
- Introduction to Dual View Photo Editing: Dual View in Photoshop revolutionizes the editing workflow by allowing users to view and edit two separate areas of an image simultaneously. This feature enhances precision, facilitates complex retouching tasks, and significantly improves the efficiency of the editing process.
- Advantages of Dual View Editing: The advantages of Dual View are multifaceted. From streamlining retouching workflows to comparing different adjustments in real-time, this feature empowers users to achieve unparalleled precision, making it an invaluable tool for photographers and designers alike.
Section 2: Accessing Dual View in Photoshop
- Opening Dual View: Access Dual View by navigating to the Window menu and selecting Arrange > New Window for [Your File Name]. This action opens a second view of your image, creating a dual-view workspace.
- Arranging Dual Views: Customize your workspace by arranging dual views horizontally or vertically, depending on your preferences and the specific requirements of your editing task.
Section 3: Basic Functions of Dual View
- Navigating and Zooming: Understand the basic navigation and zooming functions in Dual View. This includes syncing zoom levels, panning across both views, and efficiently navigating through different areas of your image.
- Synchronized Scrolling: Enable synchronized scrolling to ensure that both views move in tandem. This feature maintains alignment between the two views, making it seamless to compare and edit different parts of the image.
Section 4: Real-World Applications and Techniques
- Portrait Retouching: Utilize Dual View for precise portrait retouching. Compare details like skin tones, blemishes, and fine details side by side, allowing for meticulous adjustments without losing context.
- Landscape Editing: Enhance landscape images by leveraging Dual View. Compare the sky and foreground, ensuring consistent color grading and seamless blending of different elements in your composition.
- Product Photography: Perfect product images by using Dual View to compare and edit specific details simultaneously. This is especially useful for ensuring consistency in lighting, shadows, and reflections.
Section 5: Advanced Techniques and Tips
- Smart Object Workflow: Incorporate Smart Objects into your Dual View workflow for non-destructive editing. This allows for flexibility in making adjustments and ensures that your edits are easily reversible.
- Layer Masking in Dual View: Master the art of layer masking with Dual View. Visualize the impact of your masking decisions in real-time, achieving precise and seamless blending of different elements within your composition.
- Adjustment Layers and Dual View: Leverage Adjustment Layers to fine-tune your edits in Dual View. Compare the effects of adjustments such as Curves, Levels, and Hue/Saturation across different areas of your image simultaneously.
Section 6: Workflow Efficiency and Best Practices
- Customizing the Workspace: Tailor your workspace for optimal efficiency. Customize the arrangement of panels, tools, and views to create a personalized editing environment that maximizes productivity.
- Utilizing Dual View with Multiple Monitors: Take advantage of multiple monitors for an expanded Dual View experience. Spread your views across different screens to increase the real estate for editing and comparing details.
- Saving and Exporting: Understand the best practices for saving and exporting your work when using Dual View. Ensure that your edits are preserved, and the final image meets your intended specifications.
Section 7: Undo and History States in Dual View
- Reverting Changes: Familiarize yourself with the Undo (Ctrl + Z or Command + Z) and Step Backward (Alt + Ctrl + Z or Option + Command + Z) commands. These tools are essential for reverting changes or navigating through your editing history in Dual View.
- History Panel in Dual View: Maximize the use of the History panel in Dual View to review and jump back to specific points in your editing process. This offers a comprehensive overview of your workflow and helps troubleshoot any undesired changes.
Conclusion:
In conclusion, Dual View Photo Editing in Adobe Photoshop elevates the editing experience to new heights of precision and efficiency. This comprehensive guide has navigated through the basics, real-world applications, advanced techniques, workflow efficiency tips, and best practices. Whether you’re a seasoned professional seeking enhanced precision in your retouching workflows or a budding photographer aiming to streamline your editing process, mastering Dual View empowers you to achieve flawless and impactful results. Embark on this journey of efficiency and precision, experiment with the myriad possibilities offered by Dual View, and witness your editing capabilities reach new heights of sophistication in the realm of digital photography and design.