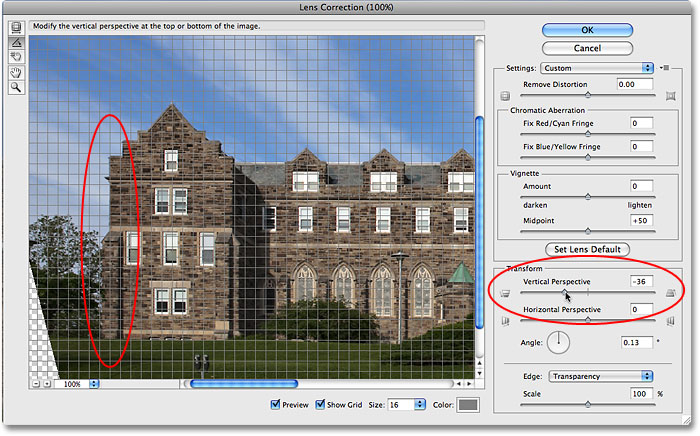
Introduction:
In the dynamic realm of digital photography and design, achieving impeccable precision is often the key to transforming a good image into a masterpiece. Keystoning, the distortion that occurs when capturing tall structures at an angle, can be a common challenge. Adobe Photoshop, a versatile tool in the creative arsenal, provides powerful features for Perspective Correction, allowing photographers and designers to rectify keystoning and bring balance and harmony to their compositions. This comprehensive guide explores the intricacies of Perspective Correction in Photoshop, delving into its features, applications, and providing step-by-step tutorials to empower users in their pursuit of flawless and aesthetically pleasing images.
Section 1: Unraveling the Art of Perspective Correction
- Understanding Keystoning: Keystoning occurs when photographing tall structures from an angle, leading to converging lines that distort the perceived proportions of the object. Recognizing keystoning is the first step in rectifying this distortion during the editing process.
- Importance of Perspective Correction: Perspective Correction in Photoshop is a crucial tool for maintaining the visual accuracy of architectural elements, ensuring that vertical lines remain parallel and true to their actual orientation. This correction is vital for professional and aesthetically pleasing images.
Section 2: Accessing Perspective Correction Tools in Photoshop
- Crop Tool Perspective Correction: Photoshop’s Crop Tool offers a Perspective option that allows users to straighten and correct converging lines in a simple and intuitive manner. Learn how to access and utilize this feature for quick and effective perspective correction.
- Adaptive Wide Angle Filter: The Adaptive Wide Angle filter in Photoshop provides a more advanced approach to perspective correction. Explore the features of this tool, which is particularly useful for correcting distortion in wide-angle shots and panoramas.
Section 3: Step-by-Step Tutorials for Perspective Correction
- Using the Crop Tool for Basic Correction:
- Open your image in Photoshop.
- Select the Crop Tool (C) and click on the Perspective icon in the Options bar.
- Drag the corner handles to align vertical lines and correct the perspective.
- Press Enter to apply the correction.
- Applying Perspective Correction with Adaptive Wide Angle Filter:
- Open your image in Photoshop.
- Go to Filter > Adaptive Wide Angle.
- Use the tools in the filter dialog to draw lines along straight elements in the image, correcting distortions automatically.
- Fine-tune settings as needed and click OK to apply the correction.
Section 4: Real-World Applications and Techniques
- Architectural Photography: Perspective Correction is crucial for architectural photography, where maintaining the integrity of building structures is paramount. Learn how to correct keystoning in shots of tall buildings, ensuring a professional and polished result.
- Interior Photography: In interior photography, correcting perspective distortion becomes essential when capturing rooms and spaces. Discover techniques for straightening lines and achieving a natural and visually pleasing representation of interiors.
- Landscape Photography: Apply perspective correction in landscape photography to ensure that elements like trees and mountains maintain their natural proportions. This enhances the overall visual appeal of the landscape image.
Section 5: Advanced Techniques and Tips
- Manual Perspective Correction with Transform Tools: Explore manual perspective correction using Photoshop’s Transform tools. This method provides precise control over each element in the image, allowing for customized adjustments beyond the automated features.
- Layer Masking for Selective Correction: Combine perspective correction with layer masking for selective adjustments. This technique is useful when correcting the perspective of specific elements within the frame while leaving others untouched.
- Utilizing Vanishing Point for Complex Scenes: Tackle complex scenes with multiple planes using the Vanishing Point filter in Photoshop. Learn how to establish perspective planes and correct distortions in intricate compositions effectively.
Section 6: Workflow Efficiency and Best Practices
- Maintaining Image Quality: Prioritize maintaining image quality during perspective correction. Utilize non-destructive editing techniques, such as Smart Objects, to preserve the original image and allow for flexible adjustments.
- Organizing Layers and Smart Objects: Keep your workflow organized by naming and grouping layers. Convert layers to Smart Objects to maintain flexibility and make iterative changes to perspective corrections seamlessly.
- Batch Processing for Efficiency: Streamline your workflow by using batch processing for perspective correction. Apply the same correction settings to multiple images, ensuring consistency in perspective across a series of photographs.
Section 7: Undo and History States in Perspective Correction
- Reverting Changes: Familiarize yourself with the Undo (Ctrl + Z or Command + Z) and Step Backward (Alt + Ctrl + Z or Option + Command + Z) commands. These tools are essential for reverting changes or navigating through your editing history during perspective correction.
- History Panel: Utilize the History panel to review and jump back to specific points in your editing process. This offers a comprehensive overview of your workflow and helps troubleshoot any undesired changes in perspective correction.
Conclusion:
In conclusion, the art of Perspective Correction in Photoshop is a powerful skill that transforms distorted images into visually pleasing and accurate representations. This comprehensive guide has navigated through the basics, real-world applications, advanced techniques, workflow efficiency tips, and best practices. Whether you’re a seasoned photographer seeking precision in architectural shots or a designer looking to refine the perspective of graphical elements, mastering Perspective Correction empowers you to achieve flawless and impactful results. Embark on this journey of precision, experiment with the multitude of tools Photoshop offers, and witness your images undergo a transformation that brings them closer to the visual accuracy and aesthetic excellence you envision.