Introduction:
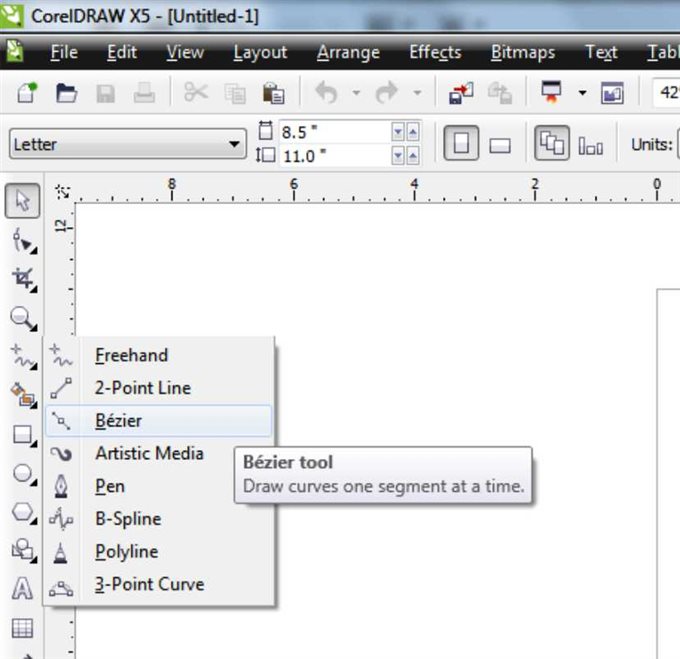
CorelDRAW, a powerhouse in the realm of digital design, empowers creators with a diverse set of tools to bring their visions to life. Among the fundamental instruments are the Freehand and Bézier tools, each offering unique capabilities for drawing lines, shapes, and curves. In this extensive guide, we will delve into the intricacies of setting options for the Freehand and Bézier tools in CorelDRAW, exploring techniques, customization options, and advanced tips to enhance your precision and control over these indispensable tools.
Understanding the Freehand and Bézier Tools:
- Freehand Tool: The Freehand tool in CorelDRAW allows for free-form drawing by following the movement of the hand. It’s particularly useful for sketching, doodling, or creating organic shapes with a more spontaneous and fluid feel.
- Bézier Tool: The Bézier tool, on the other hand, is designed for precision. Named after the French engineer Pierre Bézier, this tool lets users draw smooth and controlled curves by defining anchor points and manipulating control handles.
Setting Options for the Freehand Tool:
- Accessing Tool Options: To set options for the Freehand tool, select the tool from the toolbar or press the ‘F’ key. Navigate to the ‘Tool Options’ or ‘Property Bar’ to access a range of customization settings.
- Line Thickness and Color: Adjust the line thickness and color by specifying values in the ‘Tool Options’ or ‘Property Bar.’ This allows you to control the visual appearance of the lines drawn with the Freehand tool.
- Smoothing and Simplifying: CorelDRAW offers options to control the smoothness and simplification of Freehand lines. Adjust these settings to influence the software’s interpretation of your hand movements, resulting in cleaner or more dynamic lines based on your preference.
- Pressure Settings (if applicable): For devices that support pressure sensitivity, such as graphic tablets, explore pressure settings in the ‘Tool Options’ or ‘Property Bar.’ Customize how line thickness responds to pressure, enabling a more natural and expressive drawing experience.
Setting Options for the Bézier Tool:
- Accessing Tool Options: Activate the Bézier tool from the toolbar or press the ‘B’ key. Similar to the Freehand tool, navigate to the ‘Tool Options’ or ‘Property Bar’ to access a plethora of customization settings for the Bézier tool.
- Line Thickness and Color: Tailor the line thickness and color for the Bézier tool in the ‘Tool Options’ or ‘Property Bar.’ This ensures consistency in visual presentation across your designs.
- Node Type and Shape: Customize the type of nodes created by the Bézier tool. Choose between cusp, smooth, and symmetric nodes based on your design requirements. Additionally, explore the ‘Node Type’ and ‘Shape’ options to refine the behavior of control handles.
- Snap to Guidelines and Objects: Enhance precision by enabling ‘Snap to Guidelines’ and ‘Snap to Objects’ options. This ensures that your Bézier curves align seamlessly with guidelines or existing elements in your design.
Advanced Techniques for Both Tools:
- Custom Keyboard Shortcuts: Streamline your workflow by assigning custom keyboard shortcuts to frequently used options. This allows for quick access to specific settings, saving time and boosting efficiency.
- Saving Custom Presets: If you have preferred configurations for the Freehand and Bézier tools, consider saving them as custom presets. This ensures that your preferred settings are readily available for different projects or design scenarios.
- Dynamic Guides for Alignment: Leverage dynamic guides to aid in precise alignment. These guides provide real-time feedback, assisting you in maintaining symmetry and consistency while drawing with both the Freehand and Bézier tools.
Troubleshooting and Optimization Strategies:
- Adjusting Tablet Sensitivity (if applicable): If using a graphic tablet with the Freehand tool, explore tablet sensitivity settings in your device preferences. Fine-tune the sensitivity to match your drawing style and achieve optimal control.
- Node Editing for Fine-Tuning: After drawing with the Bézier tool, utilize the Node Edit tool to fine-tune individual anchor points and control handles. This level of granular control enhances precision in your designs.
Conclusion:
Setting options for the Freehand and Bézier tools in CorelDRAW is a crucial step in unlocking their full potential. By mastering the customization settings and exploring advanced techniques outlined in this comprehensive guide, you’ll gain unprecedented control over these essential drawing tools. Whether you’re sketching freehand designs with spontaneity or crafting precise curves with the Bézier tool, CorelDRAW empowers you to bring your creative vision to life with precision and efficiency. Embrace the wealth of options at your fingertips, and let the Freehand and Bézier tools be your trusted companions in the digital realm of design.