Introduction:
In the realm of graphic design and digital artistry, text effects play a crucial role in adding depth, dimension, and visual interest to compositions. One intriguing effect that designers often seek to achieve is the ghostly blur text effect, which imbues typography with an ethereal and mysterious quality. This effect can be particularly captivating for a wide range of design projects, from posters and album covers to digital artworks and social media graphics. In this comprehensive tutorial, we will explore step-by-step techniques, tips, and creative possibilities to master the ghostly blur text effect in Adobe Photoshop.
Understanding the Ghostly Blur Text Effect:
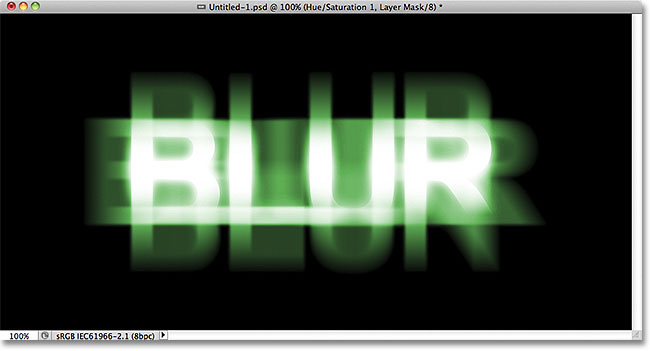
The ghostly blur text effect is characterized by text that appears to be translucent, ethereal, and slightly out of focus, creating a sense of mystery and intrigue. This effect can evoke feelings of nostalgia, surrealism, or otherworldliness, making it ideal for designs that aim to captivate viewers and evoke emotions. Achieving the ghostly blur text effect involves a combination of layer blending modes, filters, and adjustments in Photoshop to create a soft, dreamlike appearance that is both visually striking and evocative.
Now, let’s delve into the step-by-step process of creating the ghostly blur text effect in Photoshop:
Step 1: Setting Up the Document:
Start by opening Adobe Photoshop and creating a new document with dimensions suitable for your design project. Choose a resolution and color mode appropriate for your intended output, such as print or digital display.
Step 2: Adding Text:
Select the Type tool (T) from the toolbar and click on the canvas to create a text layer. Type your desired text using a bold and legible font that will serve as the base for the ghostly blur effect. Experiment with different fonts and sizes to find one that suits your design vision.
Step 3: Duplicating the Text Layer:
With the text layer selected in the Layers panel, duplicate the layer by pressing Ctrl/Cmd + J or by right-clicking on the layer and selecting “Duplicate Layer.” This duplicate layer will serve as the base for applying the blur effect.
Step 4: Applying Gaussian Blur:
With the duplicate text layer selected, go to Filter > Blur > Gaussian Blur from the top menu. Adjust the radius setting in the Gaussian Blur dialog box to apply a subtle blur effect to the text. Aim for a blur radius that softens the edges of the text without completely obscuring it.
Step 5: Adjusting Layer Opacity:
Lower the opacity of the blurred text layer to achieve the desired level of transparency and ghostly appearance. This step is crucial for creating the ethereal effect, as it allows the background to show through the blurred text, adding to the ghostly illusion.
Step 6: Adding Layer Styles:
To further enhance the ghostly blur effect, experiment with adding layer styles to the blurred text layer. Double-click on the layer to open the Layer Style dialog box, then explore options such as Outer Glow, Inner Glow, and Drop Shadow to add subtle highlights and shadows that complement the overall ghostly aesthetic.
Step 7: Blending Modes:
Experiment with different blending modes for the blurred text layer to achieve interesting and unique effects. Overlay, Soft Light, and Screen blending modes often work well for blending the blurred text with the background while preserving the ghostly appearance.
Step 8: Fine-Tuning and Refining:
Take the time to fine-tune and refine the ghostly blur text effect to achieve the desired look and feel. Experiment with adjusting the opacity, blur radius, and layer styles to enhance the ghostly illusion and ensure that the text integrates seamlessly with the rest of the design elements.
Step 9: Adding Background Elements:
Consider incorporating additional design elements such as textures, gradients, or images to complement the ghostly blur text effect and enhance the overall composition. Experiment with layer blending modes and opacity levels to integrate these elements seamlessly with the text and background.
Step 10: Final Touches and Exporting:
Once you’re satisfied with the ghostly blur text effect and overall composition, take the time to make any final adjustments or refinements to the design. Fine-tune the colors, contrast, and overall atmosphere to ensure that the design evokes the desired mood and aesthetic. When you’re happy with the final result, save your work and export the design in a high-quality format suitable for your intended use.
Advanced Techniques and Tips:
In addition to the basic steps outlined above, consider exploring advanced techniques and tips to further enhance the ghostly blur text effect:
- Texture Overlays: Experiment with incorporating texture overlays or pattern fills to add depth and visual interest to the ghostly text effect. Textures such as grunge, paper, or fabric can enhance the ethereal quality of the text and create a more dynamic composition.
- Color Grading: Experiment with color grading techniques to adjust the overall color tone and mood of the design. Use adjustment layers such as Hue/Saturation, Color Balance, or Gradient Map to create subtle shifts in color that complement the ghostly blur text effect and enhance the overall atmosphere.
- Layer Masking: Use layer masking to selectively reveal or conceal parts of the blurred text layer, allowing for precise control over the appearance and blending of the text with the background or other elements. This technique can be particularly useful for creating subtle transitions and adding depth to the design.
Conclusion:
In conclusion, mastering the ghostly blur text effect in Photoshop offers designers a creative and versatile way to add depth, dimension, and intrigue to their compositions. By following the step-by-step techniques outlined in this tutorial and experimenting with advanced techniques and tips, designers can unleash their creativity and produce stunning artworks that captivate viewers and evoke emotions. Whether used in posters, album covers, digital artworks, or other design projects, the ghostly blur text effect offers endless possibilities for expression and experimentation. Embrace the power of digital manipulation and typography, and let your imagination soar as you create ghostly designs that leave a lasting impression.