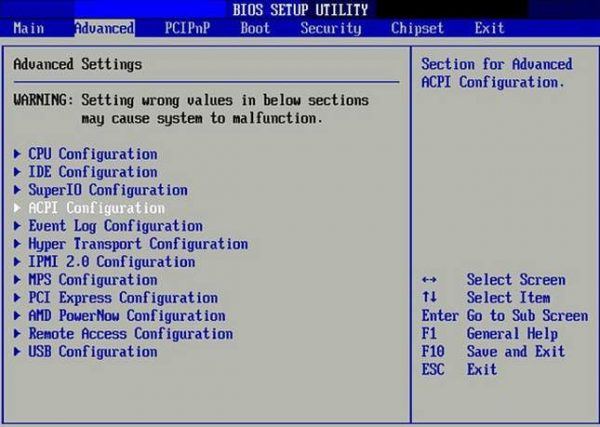
The Basic Input/Output System (BIOS) is a fundamental component of any computer system, serving as the bridge between hardware and software. It provides essential functions for initializing hardware components, conducting system checks, and booting the operating system. Accessing the BIOS allows users to configure hardware settings, diagnose issues, and perform maintenance tasks. However, with the advent of Windows 10 and the prevalence of UEFI (Unified Extensible Firmware Interface), accessing the BIOS has become less straightforward for many users. In this extensive guide, we will delve into the various methods and techniques for accessing the BIOS on Windows 10 PCs, empowering users to navigate this essential component with confidence and ease.
Understanding BIOS vs. UEFI:
Before diving into the specifics of accessing the BIOS on a Windows 10 PC, it’s essential to understand the distinction between BIOS and UEFI. BIOS (Basic Input/Output System) is the traditional firmware interface used to boot a computer and manage its hardware components. UEFI (Unified Extensible Firmware Interface) is a newer standard that offers more advanced features and capabilities, including support for larger hard drives, faster boot times, and a graphical user interface. Many modern PCs come with UEFI instead of traditional BIOS, although the terms are often used interchangeably.
1. Accessing BIOS/UEFI on Windows 10 PCs:
There are several methods for accessing the BIOS or UEFI settings on a Windows 10 PC, depending on the manufacturer and model of the computer. Here are some common methods:
a. Using the BIOS/UEFI Setup Key:
- Start or restart your computer.
- As the computer boots up, pay attention to the initial startup screen or manufacturer logo.
- Look for a message that indicates which key to press to access the BIOS or UEFI settings. Common keys include “F2,” “F12,” “Esc,” “Del,” or “Enter.”
- Press the designated key repeatedly until the BIOS or UEFI setup utility appears on the screen.
b. Using Windows 10 Settings:
- Click on the “Start” menu and select “Settings” (the gear icon).
- In the Settings window, select “Update & Security.”
- Click on “Recovery” in the left-hand menu.
- Under “Advanced startup,” click on “Restart now.”
- Your computer will restart, and you will be presented with a list of options. Select “Troubleshoot.”
- From the Troubleshoot menu, select “Advanced options.”
- Choose “UEFI Firmware Settings” or “BIOS Setup” (the option may vary depending on your PC).
- Click on “Restart” to enter the BIOS or UEFI setup utility.
c. Using Shift + Restart:
- Click on the “Start” menu and select the “Power” icon.
- Hold down the “Shift” key on your keyboard and click “Restart.”
- Your computer will restart and present you with a list of options.
- Follow the steps outlined in method b to access the BIOS or UEFI setup utility.
2. Navigating the BIOS/UEFI Setup Utility:
Once you’ve successfully accessed the BIOS or UEFI setup utility, you’ll be presented with a menu or interface that allows you to configure various settings related to hardware, boot options, and system preferences. Here are some common options you may encounter:
- Boot Order: Allows you to specify the order in which devices (such as hard drives, SSDs, optical drives, USB drives) are checked for bootable operating systems.
- System Information: Provides information about the computer’s hardware components, firmware version, and system settings.
- Security Settings: Allows you to configure security features such as password protection and Secure Boot.
- Advanced Settings: Offers additional options for configuring CPU settings, memory timings, and other advanced hardware parameters.
- Exit Options: Allows you to save changes and exit, discard changes and exit, or restore default settings.
3. Important Considerations:
When accessing the BIOS or UEFI setup utility on a Windows 10 PC, it’s essential to keep the following considerations in mind:
- Make Note of Changes: Before making any changes to BIOS or UEFI settings, carefully consider the implications and make note of the current settings. Incorrect configurations can potentially render your computer unbootable or cause other issues.
- Read Documentation: Refer to your computer’s documentation or manufacturer’s website for specific instructions and information about accessing and navigating the BIOS or UEFI setup utility.
- Seek Professional Help: If you’re unsure about making changes to BIOS or UEFI settings, or if you encounter any issues, it’s advisable to seek assistance from a qualified technician or consult with the manufacturer’s support resources.
Conclusion:
In conclusion, accessing the BIOS or UEFI setup utility on a Windows 10 PC is a fundamental skill that allows users to configure hardware settings, diagnose issues, and perform maintenance tasks. By understanding the various methods and techniques for accessing the BIOS or UEFI, users can navigate this essential component with confidence and ease. Whether you’re a novice user or a seasoned IT professional, mastering the art of BIOS/UEFI access is a valuable skill that empowers you to take control of your computer’s hardware and optimize its performance.