Introduction:
In the realm of digital photography, efficient image management is paramount to a streamlined workflow and successful project execution. Adobe Bridge stands as a powerful asset management tool, offering photographers a centralized platform for organizing, browsing, and accessing their image files. One essential task in the photography workflow is downloading photos from your camera to your computer, and Adobe Bridge provides a seamless solution for this process. In this extensive guide, we embark on a journey to explore the intricacies of downloading photos from your camera using Adobe Bridge, equipping photographers with the knowledge and techniques to optimize their workflow and enhance productivity.
Understanding the Importance of Efficient Photo Downloads:
Before delving into the process of downloading photos from your camera with Adobe Bridge, it’s essential to understand why this task is crucial for photographers. Efficient photo downloads enable photographers to quickly transfer images from their camera to their computer, allowing for timely access to files for editing, organizing, and sharing. By streamlining the download process, photographers can minimize downtime, maintain an organized image library, and ensure that valuable images are backed up and preserved.
Using Adobe Bridge for Photo Downloads:
Adobe Bridge offers a straightforward and intuitive method for downloading photos from your camera to your computer. Let’s explore the step-by-step process for downloading photos using Adobe Bridge:
- Connect Your Camera:
- Start by connecting your camera to your computer using a USB cable or card reader.
- Ensure that your camera is powered on and set to the appropriate mode for transferring images (e.g., USB mode or PC mode).
- Launch Adobe Bridge:
- Open Adobe Bridge on your computer by clicking on the application icon or selecting it from the Start menu or Applications folder.
- Navigate to the Camera:
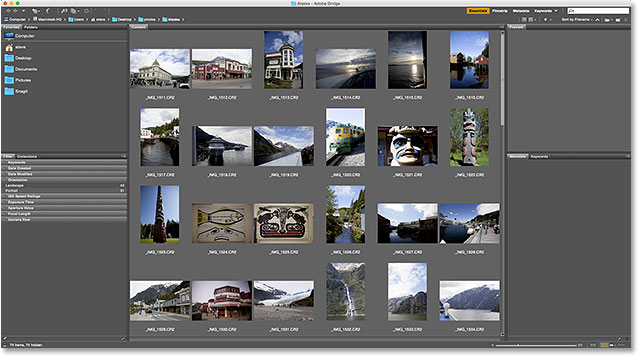
- In Adobe Bridge, navigate to the “Folders” panel on the left-hand side of the interface.
- Under the “Devices” section, you should see your connected camera listed as a removable device.
- Access the Camera Contents:
- Double-click on the icon representing your camera to access its contents within Adobe Bridge.
- You should see a list of image files stored on your camera, organized by date or folder structure if applicable.
- Select Photos for Download:
- Browse through the images on your camera and select the photos you want to download to your computer.
- To select multiple photos, hold down the Ctrl key (Windows) or Cmd key (Mac) while clicking on each photo.
- Initiate the Download:
- With the desired photos selected, right-click on one of the selected photos and choose “Get Photos from Camera” from the context menu.
- Alternatively, you can use the keyboard shortcut “Ctrl + D” (Windows) or “Cmd + D” (Mac) to initiate the download process.
- Specify Download Location:
- In the “Get Photos from Camera” dialogue box, specify the destination folder on your computer where you want the photos to be downloaded.
- You can create a new folder or select an existing folder for the download.
- Customize Download Options:
- Adobe Bridge offers various options for customizing the download process, such as renaming files, applying metadata, and organizing files into subfolders.
- Review and adjust the download options as needed before proceeding with the download.
- Start Download:
- Once you’ve specified the download location and customized the download options, click the “Get Media” button to start the download process.
- Adobe Bridge will transfer the selected photos from your camera to the specified folder on your computer.
Advanced Techniques and Considerations:
In addition to the basic steps outlined above, there are some advanced techniques and considerations to keep in mind when downloading photos from your camera with Adobe Bridge:
- RAW File Conversion:
- If shooting in RAW format, consider converting RAW files to a more accessible format such as JPEG or TIFF during the download process.
- Adobe Bridge offers options for converting RAW files to other formats, allowing for easier editing and sharing of images.
- Metadata Management:
- Use Adobe Bridge to apply metadata to downloaded photos, including keywords, copyright information, and captions.
- Applying metadata during the download process can streamline organization and make it easier to search for and categorize images later.
- Backup Strategies:
- Consider implementing a backup strategy for downloaded photos to ensure that valuable images are protected against loss or corruption.
- Adobe Bridge can be integrated with backup solutions such as cloud storage services or external hard drives for automatic backup of downloaded photos.
Conclusion:
Efficiently downloading photos from your camera is a fundamental step in the photography workflow, and Adobe Bridge offers a powerful solution for this task. By following the steps outlined in this guide and leveraging advanced techniques and considerations, photographers can streamline their workflow, optimize organization, and enhance productivity. Whether you’re a professional photographer or an amateur enthusiast, mastering the art of downloading photos with Adobe Bridge is sure to elevate your photography experience and ensure that your valuable images are safely stored and accessible whenever you need them. So, dive in, explore the capabilities of Adobe Bridge, and unlock the full potential of your digital photography workflow.