Introduction:
In the digital age, a reliable and fast internet connection is essential for seamless communication, work, and entertainment. Wiring an Ethernet wall socket is a fundamental skill that empowers individuals to create a wired network infrastructure within their homes or offices. This comprehensive guide explores the step-by-step process of wiring an Ethernet wall socket, ensuring a stable and efficient network connection for your devices.
Section 1: Understanding Ethernet Wiring Standards
1.1 Ethernet Cable Types:
- Familiarize yourself with common Ethernet cable types, such as Cat5e, Cat6, or Cat6a. Each category has specific performance characteristics, and the choice depends on the desired network speed and application.
1.2 TIA/EIA Wiring Standards:
- The TIA/EIA (Telecommunications Industry Association/Electronic Industries Association) has established wiring standards for Ethernet cables. Understanding these standards ensures compatibility and reliability in network connections.
Section 2: Gathering Tools and Materials
2.1 Tools Required:
- Prepare the necessary tools, including a cable stripper, crimping tool, wire tester, punch-down tool, and screwdrivers. These tools are essential for cutting, stripping, crimping, and testing Ethernet cables.
2.2 Materials Needed:
- Acquire the required materials, such as Ethernet cables, wall plates, keystone jacks, and an Ethernet wall socket. Choose high-quality materials to ensure the durability and longevity of the network installation.
Section 3: Planning the Installation
3.1 Determining Cable Length:
- Measure the distance between the Ethernet wall socket location and the network switch or router. It’s crucial to determine the appropriate cable length to avoid signal degradation.
3.2 Identifying Wall Placement:
- Choose an optimal location for the Ethernet wall socket, considering factors like proximity to devices, aesthetics, and accessibility. Ensure that the chosen wall space allows for a clean and organized installation.
Section 4: Wiring the Ethernet Cable
4.1 Stripping the Cable:
- Use the cable stripper to carefully remove the outer jacket of the Ethernet cable, exposing the twisted pairs of wires. Exercise caution to avoid damaging the inner conductors.
4.2 Arranging Wires According to TIA/EIA Standards:
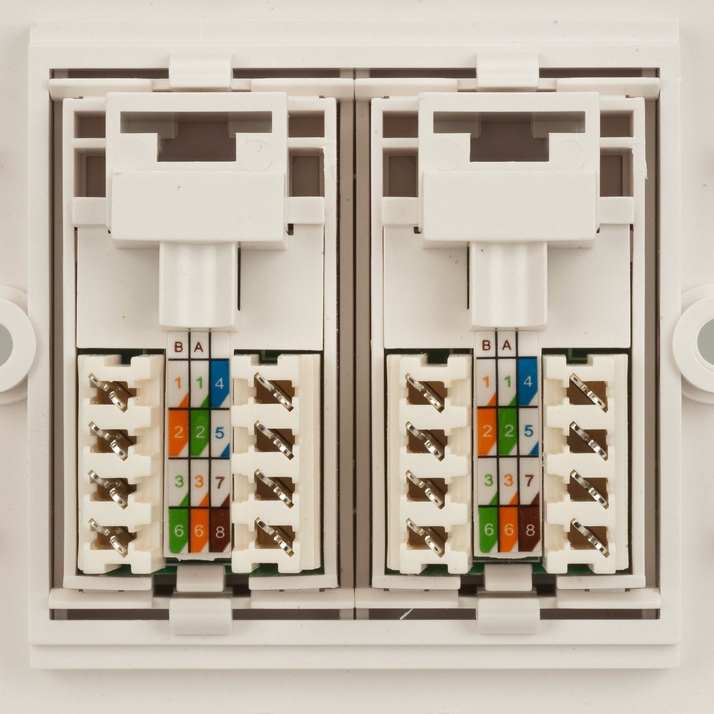
- Arrange the color-coded wires within the Ethernet cable according to TIA/EIA standards. Typically, the arrangement follows the pattern: white with blue, blue, white with orange, orange, white with green, green, white with brown, and brown.
4.3 Terminating the Cable with RJ45 Connectors:
- Insert the arranged wires into an RJ45 connector, ensuring that each wire reaches the end of the connector. Use the crimping tool to secure the wires in place. Repeat the process for the other end of the cable.
Section 5: Installing Keystone Jacks
5.1 Preparing the Keystone Jack:
- Use the punch-down tool to prepare the keystone jack by securing the color-coded wires in their designated slots. Follow TIA/EIA standards to ensure proper alignment.
5.2 Attaching Keystone Jack to Wall Plate:
- Insert the keystone jack into the appropriate slot on the wall plate. Secure the keystone jack in place, ensuring a snug fit within the wall plate.
Section 6: Mounting the Wall Plate and Socket
6.1 Attaching the Wall Plate:
- Secure the wall plate to the chosen location on the wall using screws. Ensure that the wall plate is level and firmly attached for a professional and aesthetically pleasing installation.
6.2 Inserting the Ethernet Wall Socket:
- Carefully insert the Ethernet wall socket into the wall plate, aligning it with the keystone jack. Use the provided screws to secure the socket in place.
Section 7: Testing the Connection
7.1 Using a Cable Tester:
- Utilize a cable tester to verify the integrity of the wired connection. The tester will indicate whether the Ethernet cable is properly wired and ready for use.
7.2 Checking Network Connectivity:
- Connect a device, such as a computer or laptop, to the Ethernet wall socket using a short Ethernet cable. Verify that the device successfully establishes a network connection.
Section 8: Troubleshooting and Fine-Tuning
8.1 Addressing Connection Issues:
- If connectivity issues arise, carefully inspect the Ethernet cable for damage or incorrect wiring. Use the cable tester to identify any faults and make necessary corrections.
8.2 Optimizing Cable Management:
- Organize and secure excess cable length to avoid clutter and potential tripping hazards. Utilize cable clips or adhesive cable organizers for a tidy and efficient cable management solution.
Conclusion:
Wiring an Ethernet wall socket is a skill that empowers individuals to create a robust and reliable wired network infrastructure. By following the step-by-step guide outlined in this comprehensive overview, users can confidently navigate the intricacies of Ethernet cable preparation, termination, and installation. With careful planning, adherence to industry standards, and the use of quality tools and materials, anyone can master the art of wiring an Ethernet wall socket. Welcome to a world of seamless connectivity, where your devices thrive on the strength of a well-constructed and meticulously installed wired network.